Hello

Hello, this is the less formal but way more exciting part of my website where I post all of my tech experiments.

Search This Blog

Thursday, May 6, 2021

Generating Interior Layouts: Experiments 1 & 2

When dealing with interior scenes frequently, one might find themselves wishing the scene would build itself. Interior design seems to have a codifiable set of rules. Let's experiment with automating the process.


Experiment 1: Asset Placement Methods

As a first experiment with automating asset placement for interiors, I decided to tackle a few primary goals.


- Place assets without collision

- Have multiple placement behaviors depending on the asset type

- Furniture placed against a wall and oriented correctly

- Furniture placed in the center of the room


Here is a result of my asset placement tool.


The tool comes with some simple controls.

The seed randomizes the placement of the assets.


The mid-room padding is the distance between the blue area where the mid-room objects spawn and the edge of the ground plane.


Room height, width, and length do what you would expect. The structure is fairly simple.


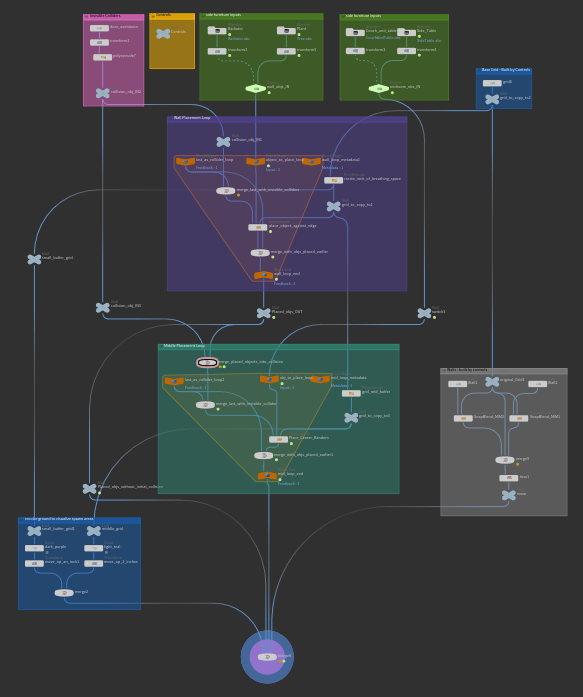
The two green boxes at the top are the asset inputs for each of the two placement types: "flush to wall" and "middle of the room".


The small pink box allows you to create a placeholder object that will not show up in render but can preserve a location in the room so that no assets are placed there.


The large purple and teal boxes in the middle are the placement loops for each of the types.


These loops are set to run for as many iterations as there are inputs to the switch (in the green input box). They update every loop to ensure that the most recently added object is included in the collision detection.

The other boxes contain controls, build the room, and color the floor to visualize placement.


What are the limits of this tool?

- It does not place objects in arrangements that make sense
- It only generates rectangular rooms
- In a tightly packed room, occasionally an object won't fit so it doesn't get placed
-Placement is based on a guess and check system that runs 200 times at max. If the object cannot be placed in 200 guesses the algorithm assumes there isn't room and doesn't place it
- Collision detection on high poly objects can take a while

The aspect I'd like to focus on is the lack of arrangement. Interior designers use common arrangements to create functionality for an area. The key is to create a generator for these arrangements that group these objects before they are placed. I created a "living room entertainment center" generator as an example.

Experiment 2: Generating Interior Design Arrangements

Building this tool was surprisingly easier than the first. The tool places assets by kind, relative to the bounding-boxes of the other assets. So, when a larger asset is switched in, the assets adjust placement accordingly. In this image, you can see the dependencies of each asset. The couch and TV are positioned relative to the control plane at the base(yellow). The rest of the assets are positioned relative to the couch(green).


Generating interior design arrangements this way allows for more realistic placement. Once these arrangements are generated, they can be combined into a room using a similar tool to the first one I built.

What are the limits of this tool?

- Currently, it is only switching between assets that are plugged into the switch rather than pulling them from a database 
-I imagine this would be an easy fix with a python script
- The assets must be built true to scale and in Z-forward orientation
- There is no asset type occurrence probability. All asset types are present at all times
- The generator only uses one base arrangements: the couch and chair facing the TV
- To fix this I would probably build a few variations on this tool and switch between them. This only took about 4 hours to make the first time. I imagine making additional versions wouldn't be too hard.

These experiments have put into perspective the difficulties of automating interior layouts. Overall I am feeling optimistic about the achievability of my goal. Considering the time frame, I got further along in my experiments than I expected to.

P.S.

Before closing, I wanted to briefly mention the SnapBlend tool that I wrote earlier this year. It basically turns bounding-box snapping and blending into an easy-to-use node.


Basically, it does this.

It places an object relative to another object's and its own bounding-boxes. So I can place an object relative to another object's positive XZ bounding corner with an additional offset by setting a transform node after it.

That's the end.

Friday, April 30, 2021

Arbitrary Style Transfer in an Illustrative Workflow

Style transfer tends to be an awkward topic around my artist friends. There are two general perspectives that I see. First is fear that the world won't need their skills if AI starts illustrating. The more prevalent idea is that style transfer doesn't do anything artistically useful.

To figure out the truth about style transfer, I decided to dive into it myself. I started by downloading an arbitrary style transfer app called Pikazo onto my iPhone. (There are better methods with more control but, this the most artist-friendly interface that I have found for style transfer)


The marketing for Pikazo is that it takes a photo and a reference piece of art and then recreates the photo in the style of the original. let's do some tests.

I started with something I thought might be a bit simpler because glitch art elements are a little less context-sensitive than say a cartoon style in which case the AI needs to be able to tell where the eye is and where the mouth is etc...

Then I tried a more complicated one based on an illustrative portrait by Kevin D. Sezgin
As an artist, you might look at these two examples and be discouraged at the possibilities of this tool. Both results look like mush. There seems to be no rhyme or reason for how the style elements are applied to the image. In some ways, style transfer just needs to gain more conceptual processing capabilities but, I want to give you a few tips on how to use arbitrary style transfer in a useful way as it exists today.

1. Choose Textural images rather than illustrative images for style reference

2. Give the AI a jump start by starting a bit of the process before feeding the image to the AI

3. Use the result as an underpainting rather than the final result.

let's see these principles applied
I will start by brushing over my photo with the smudge tool.


Feed it through with a textured image
Modify the result to accentuate focus points

Here is another example:


By using these three techniques I can get much better results.

An AI developer may say that I didn't use the best examples in the first attempts by choosing illustrative examples instead of using an abstractly textured image like a Van Gogh painting in my earlier examples. To that, I would say, "That type of example uses ambiguity to hide the shortcomings of style transfer and is not how most artists would need this tool."

Here is another method I tested for creating an underpainting using style transfer.

Create mattes

Style transfer appropriate textures onto mattes.


Apply multiple style transfers to the whole image and apply selectively.

Paint over the result.

Final Result

You need to understand both how a tool works and how it is broken to feed it the right ingredients for it to return the desired result. If it isn't working massage the material. Don't assume that AI tools will work intuitively out of the box. Many of these tools are in the research and development stage and need the experimentation of artists to discover best practices.

Monday, March 8, 2021

Perspective Correction for XR using UV hacks (virtual-production-ish stuff)

Here is the end result and you can read more if you think its interesting.


Why I find this interesting
Firstly, because of its relevance in things like virtual-production-like techniques used in filming The Mandalorian and secondly I think that perspective correction offers a zero barrier opportunity for a single viewer to experience mixed reality.

An idea of application
In my head I am picturing a gallery filled with mostly traditional art but when you walk by one frame it has a screen with a 3D scene portrayed inside it. As you walk by, the screen morphs to display the scene so that it looks approximately correct from the angle you are looking at it as though the screen were a window to another world rather than a flat image.

Some limitations to this method are:

- you can only have one primary viewer at a time (fine with the current social distancing)
- the lack of stereoscopy can be disorienting (the perspective correction is averaged between the eyes)

How to UV hack it
Here is a basic overview of how to achieve this using touch designer. I will not be going over every button click in detail just the main concepts.

You will need:
    an Xbox Kinect and adapter for PC
    TouchDesigner
    a human head (could be yours)
    a general understanding of how UVs work

Step 1: Setting up the virtual scene
Add a box with the dimensions of your screen.
Separate into two objects one with just the 'screen object' itself and one with the 'box back'.
The 'box back' will eventually be replaced with whatever you want to be viewed through the screen but for now it will be a stand-in for us to test whether perspective correction is working

Step 2: Calibration
Set up the kinect with touch designer and isolate the head and a hand input. The hand will be used for calibration.

Create a place holder object and input the hand location to it.
The object should mirror your movements in virtual space.
Place your hand on the corner of the computer screen and match transforms of the 'box back' and 'screen object' to it.
Then do the same for another corner.

Step 3: UV hacking
Once the screen is properly calibrated in the virtual world add a camera and reference your head location to the transform of the camera. Then put the 'screen object' as the look at object for the camera.
only include the 'box back' in the renderable objects. Do not include the screen
Then project UVs onto the screen object from the camera perspective
You will need to subdivide your 'screen object' before you do this because UV's are linearly interpreted between vertices.

Then set up another camera that is pointed directly at the 'screen object'
Then output that render.

And that's it.


Thursday, March 4, 2021

Training a ML Network to recognize Lucky Charms using Synthetic Data in Blender

**This exploration was completed with the help of Immersive Limit's Blender Synthetics Course**

First I gathered a small data set to test against by photographing 3 different kinds of lucky charms marshmallows with my phone against a white background.


I split them into folders of their class and created a photoshop action that reduced their resolution to 224 and saved the image.

Then, I opened a new file in Blender to create the synthetic data.
First, I created a base mesh for the Love marshmallow.

Then, I created a geometry nodes modifier to subdivide and randomize the shape a bit so that each render's shape would be slightly different. The geometry nodes distort the shape in 2 ways: one large distortion on the base mesh to vary the shape of the whole and a second displacement to vary the subdivided surface to create texture.


One benefit of using geometry nodes is that, similar to materials, a set of geometry nodes can be applied to any number of objects, and modification of that set will be universally applied.

Next, I created a material to approximate the surface of the Marshmallow.

While not photoreal, I was intentional about including variation in the surface color and displacement that could easily be controlled by an external script.
I then created 2 more base meshes for Luck and BlueMoon and linked them to the same set of geometry nodes for shape variation.


I duplicated the material from Love and made a variation for the other two.


I then created a simple environment with a white surface and an area light. I also created a simple camera rig using nulls so that I could vary the angle for each shot.
I also parented all of the marshmallows to a null so that I could easily control their location and rotation.

I created a script that would render images into folders, modifying the scene each time.


The object variations are crucial to creating ML that can generalize.
I rendered 300 training images 80 validation images and 1 test image just to create the folders that I would populate with my photographs of real marshmallows to test against.


I then used my data set to retrain an ImageNet ML network using TensorFlow in Jupyter Notebooks.

I retrained the network using 7 epochs.


Once trained, I ran the test photographs through the network with a 100% success rate although I would need a larger sample size with more variation to really test its limits. For my first ML network, I am satisfied with what I have learned.