Hello

Hello, this is the less formal but way more exciting part of my website where I post all of my tech experiments.

Search This Blog

Saturday, February 11, 2023

Incrementally Tuning Synthetic Training Datasets for Satellite Object Detection

Last year I had the honor of partnering with Phillip Hale to work on a synthetic data whitepaper and am thrilled to share our results. I was responsible for all data generation. I iterated with Phillip to test variables and refine the data generation pipeline. 

I have found that iteration is often undervalued when it comes to synthetic data. It is often much more effective to take a small team and a more reduced approach to data generation but iterate daily, than to build a complex pipeline with a large team with one month turn arounds.

You can read the full paper here:


How to use PDG services to speed up PDG ropfetches in less than 5 minutes

Why do I need this? basically by default Houdini will boot up a new hython instance for every work item as it cooks in a rop fetch. this boot up period takes some time and if the export is faily simple, then booting hython might be the part of completing that work item that takes the longest. Using PDG services has brought my completion times in some cases from 3+ hours down to five minutes. (I tend to do mass exports of variations of simple geometry using PDG to generate these variations)

All PDG services does is leave several instances of hython running in the background so that they are always ready to process new work items without ever closing and rebooting.

Here is the quick start:

Given a PDG layout similar to this select your ropfetch

Select the Service tab

Toggle use ROP Fetch service

Open the tasks menu

Open PDG services

Add a service

Set the pool size to however many work items you want to run at the same time then click add.

Click start to start up the instances and stop to stop them. Any time you cook the ROP fetch while it is running it will default to using PDG services.

Now when you run your ropfetch it will not reboot hython every single work item. Congrats you just saved yourself a lot of time.


Running Bifrost Compounds through Houdini PDG

Running Bifrost compounds through Houdini PDG using bifcmd while passing in attributes dynamically is surprisingly simple

bifcmd is an executable that Bifrost provides to run Bifrost compounds headless through the command line.

STEP 1: build and publish a compound with no auto ports

For demo purpose I’ve made a simple Bifrost compound with a seed, index, and file_path input exposed this compound makes a cube randomly with a height between 1 and 2 and saves it to the file out location.


It looks like this inside
The cube looks like this
I will now publish the compound

Copy the namespace somewhere we will need that later as well as the path to the node save location

Mine Namespace is: User::Bifcmd::rand_cube_height

STEP 2: Set up environment in Houdini

Open Houdini

Create a top network

Dive inside

Select the local scheduler


Open the “Job Parms” panel

Scroll to the bottom and add an environment variable and name it PATH

We need to add the 3 folder paths to this Environment variable

the folder which contains bifcmd.exe (bifcmd.exe will launch a headless version of Bifrost):

C:\Program Files\Autodesk\Bifrost\Maya2023\2.6.0.0\bifrost\bin

The Bifrost bifcmd dependency location:

C:\Program Files\Autodesk\Bifrost\Maya2023\2.6.0.0\bifrost\thirdparty\bin

And the install location for BifrostUSD:

C:\Program Files\Autodesk\Bifrost\Maya2023\2.6.0.0\bifrost\packs\usd_pack\0.21.11\thirdparty\usd-0.21.11\bin

The locations might be different on your computer

Join the locations with a semicolon:

C:\Program Files\Autodesk\Bifrost\Maya2023\2.6.0.0\bifrost\packs\usd_pack\0.21.11\thirdparty\usd-0.21.11\bin;C:\Program Files\Autodesk\Bifrost\Maya2023\2.6.0.0\bifrost\thirdparty\bin;C:\Program Files\Autodesk\Bifrost\Maya2023\2.6.0.0\bifrost\bin

And paste them into the value box


STEP 3: add PDG attributes and shell command


Add a wedge node with count 10 and an integer attribute called seed


Set Seeds wedge type to value and the number to 0


Now place a generic generator node and connect it

In the generic generator check the run command in system shell button


Now we need to build the command

bifcmd C:\PATH_TO\rand_cube_height.json

this is the base command that tell bifcmd what json to use to run the node this should be the path to the published compound we made earlier


--set-port seed `@seed`

This flag will set given port to a given value. In this case the value is the PDG attribute @seed that we are passing in


--set-port index `@wedgeindex`

This flag will set given port to a given value. In this case the value is the PDG attribute @wedgeindex that we are passing in


 --set-port file_out C:\Proj\BifrostTools\BifCmd\output\cube`@wedgeindex`.usd 

This flag will set given port to a given value. In this case the value is the save path and we are using the PDG attribute @wedgeindex to make sure every iteration has a unique name. pick somewhere on your computer where you would like to save this


--bifrost-location "C:\Program Files\Autodesk\Bifrost\Maya2023\2.6.0.0\bifrost"

This flag tells bifcmd where bifrost is installed


--compound-name "User::Bifcmd::rand_cube_height"

This flag tells bifcmd the namespace of the node we will run, this is important because the json we pointed to earlier could have multiple nodes in it


The final command should look something like this:

bifcmd C:\PATH_TO\rand_cube_height.json --set-port seed `@seed` --set-port index `@wedgeindex` --set-port file_out C:\Proj\BifrostTools\BifCmd\output\cube`@wedgeindex`.usd  --bifrost-location "C:\Program Files\Autodesk\Bifrost\Maya2023\2.6.0.0\bifrost" --compound-name "User::Bifcmd::rand_cube_height"


 Put your command in the generic generator

Select the generic generator and hit SHIFT- V

your output folder should now have 10 cubes

If you open each cube each one should be a different height


That’s it. You have now run a Bifrost node in Houdini


Tuesday, February 8, 2022

Augmenting GAN Training with Synthetic Data

Over the past few months, I have been experimenting with ways to create concept art tools using StyleGAN ADA. One of these experiments failed brutally. Rather than focus on the successes of the other experiments, I decided to focus on the one that was going the poorest and see if I could fix it with synthetic data in Houdini.


My initial goal was to create a GAN that generated character concept art silhouettes. I had no lofty goals, just to create a Rorschach-esque GAN that created blobs that were informed by the common shape languages of character design.

THE FAILED EXPERIMENT: 

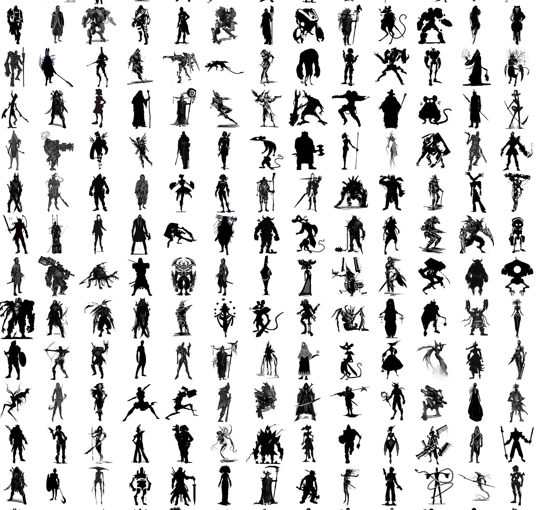
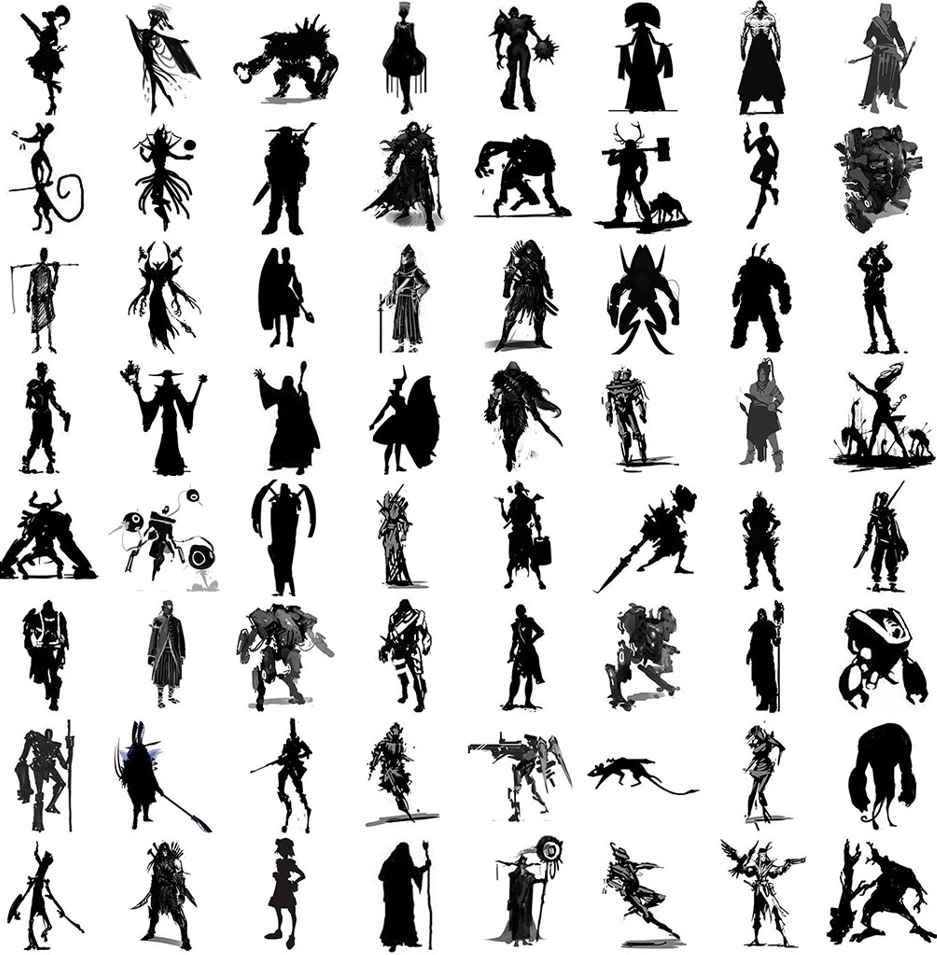
I spent an unreasonable amount of time scouring the internet for roughly 1000 images to train on. Here is a small sample of those training images.

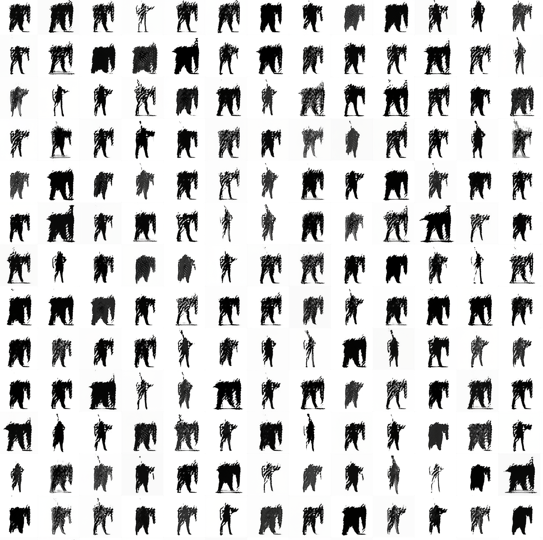
After collecting and formatting them with photoshop actions, I trained on them for a few hundred tics. these were the results.

As it continued training It devolved into this.

INFORMAL ANALYSYS:

My expectations were low but even I was unimpressed with this. The blobs were only vaguely humanoid and more importantly they had very little variety.

There were tons of things wrong with the way I trained. I honestly didn't have nearly enough training data. Training a GAN on only 1000 images is kind of a ridiculous expectation but, I'm only one person and I'm making do with the images I can get my hands on.

Rather than try to find more data like any reasonable person, I applied my "animation tutor" brain to think about what the GAN needed to learn, and why it was failing to learn it. 

I observed that it appeared to be getting the texture of the art right, my guess was that it was lacking an understanding of anatomy. I also thought it was unlikely that the GAN would learn the underlying anatomy that guides concept art just by looking at the concept art itself because, concept art tends to hint at the forms, allowing the viewer to complete it, rather than crisply portraying it. I'm sure the GAN would eventually learn but it would take much more data.

THE NEW PLAN:

Make thousands of pieces of synthetic data portraying anatomically correct silhouettes. Train the GAN on the synthetic data, then use transfer learning to retrain it on the concept art afterwards.

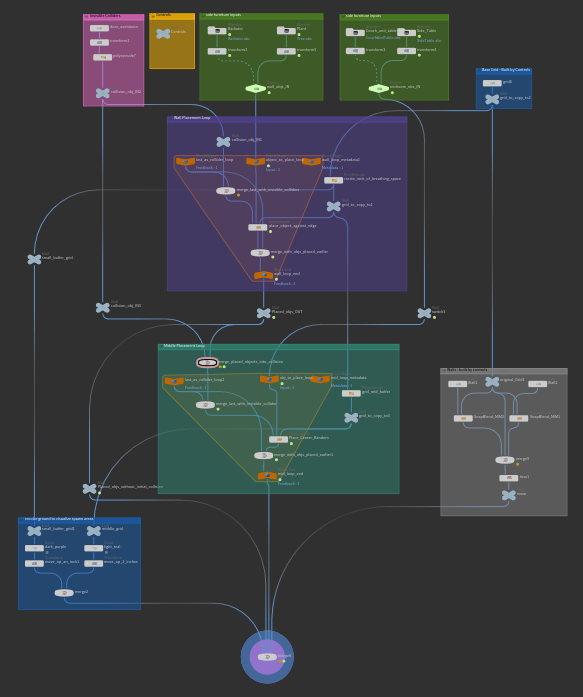
I bought a 15-dollar rig from Turbosquid, opened Houdini, set up acceptable ranges of motion for each joint in KineFX then randomized all of them.
fig. 1 "surely not EvErY oNe was kung fu fighting?"

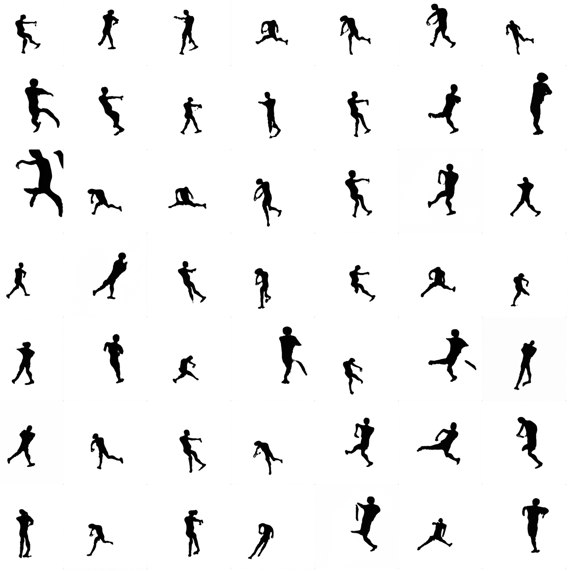
fig. 2 "the actual data I used to train"

I hit render and generated 5000 randomized versions of this (I love proceduralism <3).

NOTE: This entire process of creating and rendering took significantly less time than gathering the initial data. The Houdini work took me probably 4 hours.

I ran the training for 1000 tics on the synthetic set and got results like this.
pretty dang humanoid if you ask me.

Then I used transfer learning to re-train the same network on the concept art silhouettes


Sheeeeeesh! Thats like 1000x better than the last one. 
Here is a side-by-side comparison:

    
without synthetic data                           with synthetic data

It honestly blows my mind how well the training went after synthetics were added. Not only did the forms become more humanoid, the results also included more variation in pose and body proportions. I was also a bit surprised that none of the results looked like the crappy synthetic silhouettes that I had done pre-training on.

Here is the original concept art used to train again for comparison:
TL; DR:
Augmenting training with synthetic data allowed me to train a GAN on a very small sample of real data and improve results dramatically

DISCLAIMER:
I am completely unqualified to do any of these experiments or write about them in an academic fashion. I have a BA in Motion Design.


Thursday, May 6, 2021

Generating Interior Layouts: Experiments 1 & 2

When dealing with interior scenes frequently, one might find themselves wishing the scene would build itself. Interior design seems to have a codifiable set of rules. Let's experiment with automating the process.


Experiment 1: Asset Placement Methods

As a first experiment with automating asset placement for interiors, I decided to tackle a few primary goals.


- Place assets without collision

- Have multiple placement behaviors depending on the asset type

- Furniture placed against a wall and oriented correctly

- Furniture placed in the center of the room


Here is a result of my asset placement tool.


The tool comes with some simple controls.

The seed randomizes the placement of the assets.


The mid-room padding is the distance between the blue area where the mid-room objects spawn and the edge of the ground plane.


Room height, width, and length do what you would expect. The structure is fairly simple.


The two green boxes at the top are the asset inputs for each of the two placement types: "flush to wall" and "middle of the room".


The small pink box allows you to create a placeholder object that will not show up in render but can preserve a location in the room so that no assets are placed there.


The large purple and teal boxes in the middle are the placement loops for each of the types.


These loops are set to run for as many iterations as there are inputs to the switch (in the green input box). They update every loop to ensure that the most recently added object is included in the collision detection.

The other boxes contain controls, build the room, and color the floor to visualize placement.


What are the limits of this tool?

- It does not place objects in arrangements that make sense
- It only generates rectangular rooms
- In a tightly packed room, occasionally an object won't fit so it doesn't get placed
-Placement is based on a guess and check system that runs 200 times at max. If the object cannot be placed in 200 guesses the algorithm assumes there isn't room and doesn't place it
- Collision detection on high poly objects can take a while

The aspect I'd like to focus on is the lack of arrangement. Interior designers use common arrangements to create functionality for an area. The key is to create a generator for these arrangements that group these objects before they are placed. I created a "living room entertainment center" generator as an example.

Experiment 2: Generating Interior Design Arrangements

Building this tool was surprisingly easier than the first. The tool places assets by kind, relative to the bounding-boxes of the other assets. So, when a larger asset is switched in, the assets adjust placement accordingly. In this image, you can see the dependencies of each asset. The couch and TV are positioned relative to the control plane at the base(yellow). The rest of the assets are positioned relative to the couch(green).


Generating interior design arrangements this way allows for more realistic placement. Once these arrangements are generated, they can be combined into a room using a similar tool to the first one I built.

What are the limits of this tool?

- Currently, it is only switching between assets that are plugged into the switch rather than pulling them from a database 
-I imagine this would be an easy fix with a python script
- The assets must be built true to scale and in Z-forward orientation
- There is no asset type occurrence probability. All asset types are present at all times
- The generator only uses one base arrangements: the couch and chair facing the TV
- To fix this I would probably build a few variations on this tool and switch between them. This only took about 4 hours to make the first time. I imagine making additional versions wouldn't be too hard.

These experiments have put into perspective the difficulties of automating interior layouts. Overall I am feeling optimistic about the achievability of my goal. Considering the time frame, I got further along in my experiments than I expected to.

P.S.

Before closing, I wanted to briefly mention the SnapBlend tool that I wrote earlier this year. It basically turns bounding-box snapping and blending into an easy-to-use node.


Basically, it does this.

It places an object relative to another object's and its own bounding-boxes. So I can place an object relative to another object's positive XZ bounding corner with an additional offset by setting a transform node after it.

That's the end.