When dealing with interior scenes frequently, one might find themselves wishing the scene would build itself. Interior design seems to have a codifiable set of rules. Let's experiment with automating the process.
Experiment 1: Asset Placement Methods
As a first experiment with automating asset placement for interiors, I decided to tackle a few primary goals.
- Place assets without collision
- Have multiple placement behaviors depending on the asset type
- Furniture placed against a wall and oriented correctly
- Furniture placed in the center of the room
Here is a result of my asset placement tool.

The tool comes with some simple controls.


The mid-room padding is the distance between the blue area where the mid-room objects spawn and the edge of the ground plane.


Room height, width, and length do what you would expect. The structure is fairly simple.
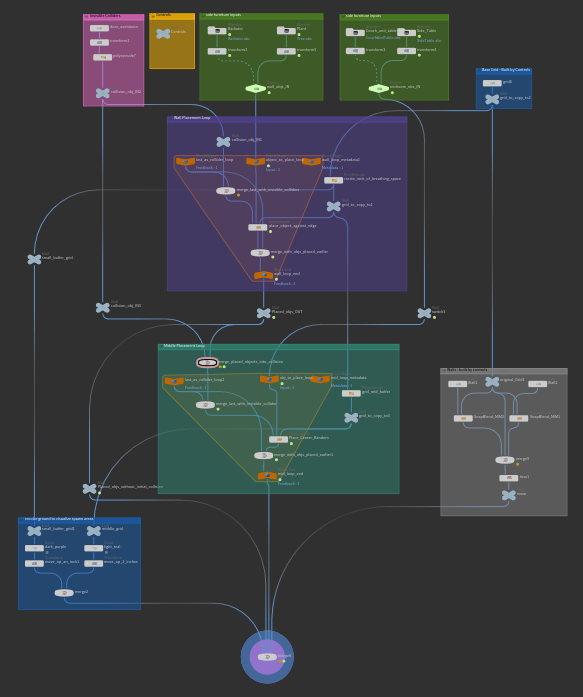
The two green boxes at the top are the asset inputs for each of the two placement types: "flush to wall" and "middle of the room".

The small pink box allows you to create a placeholder object that will not show up in render but can preserve a location in the room so that no assets are placed there.

The large purple and teal boxes in the middle are the placement loops for each of the types.


These loops are set to run for as many iterations as there are inputs to the switch (in the green input box). They update every loop to ensure that the most recently added object is included in the collision detection.
The other boxes contain controls, build the room, and color the floor to visualize placement.


What are the limits of this tool?
- It does not place objects in arrangements that make sense
- It only generates rectangular rooms
- In a tightly packed room, occasionally an object won't fit so it doesn't get placed
-Placement is based on a guess and check system that runs 200 times at max. If the object cannot be placed in 200 guesses the algorithm assumes there isn't room and doesn't place it
- Collision detection on high poly objects can take a while
The aspect I'd like to focus on is the lack of arrangement. Interior designers use common arrangements to create functionality for an area. The key is to create a generator for these arrangements that group these objects before they are placed. I created a "living room entertainment center" generator as an example.
Experiment 2: Generating Interior Design Arrangements

Generating interior design arrangements this way allows for more realistic placement. Once these arrangements are generated, they can be combined into a room using a similar tool to the first one I built.
Building this tool was surprisingly easier than the first. The tool places assets by kind, relative to the bounding-boxes of the other assets. So, when a larger asset is switched in, the assets adjust placement accordingly. In this image, you can see the dependencies of each asset. The couch and TV are positioned relative to the control plane at the base(yellow). The rest of the assets are positioned relative to the couch(green).
What are the limits of this tool?
- Currently, it is only switching between assets that are plugged into the switch rather than pulling them from a database
-I imagine this would be an easy fix with a python script
- The assets must be built true to scale and in Z-forward orientation
- There is no asset type occurrence probability. All asset types are present at all times
- The generator only uses one base arrangements: the couch and chair facing the TV
- To fix this I would probably build a few variations on this tool and switch between them. This only took about 4 hours to make the first time. I imagine making additional versions wouldn't be too hard.
These experiments have put into perspective the difficulties of automating interior layouts. Overall I am feeling optimistic about the achievability of my goal. Considering the time frame, I got further along in my experiments than I expected to.
P.S.
Before closing, I wanted to briefly mention the SnapBlend tool that I wrote earlier this year. It basically turns bounding-box snapping and blending into an easy-to-use node.
Basically, it does this.

It places an object relative to another object's and its own bounding-boxes. So I can place an object relative to another object's positive XZ bounding corner with an additional offset by setting a transform node after it.
That's the end.
No comments:
Post a Comment